How to Transcribe a Microsoft Teams Recording Locally

A Teams recording is useful only when you can find what was said. If the meeting contains customer details, internal plans, or sensitive project notes, sending the file to another service may not be acceptable. A local workflow lets you download the recording legally, transcribe it on your own computer, review the result, and export the format you actually need.
This guide covers a practical path from a downloaded Teams recording to a searchable transcript, subtitle file, or speaker-aware set of notes. The exact menu names vary by your organisation’s Teams setup, but the sequence stays the same.
Before you start: get the recording and permission
Only download and process a meeting recording when you have the right to do so. A recording may belong to the organiser, the organisation, or the people in the meeting. Follow your retention, consent, and access policies before copying it to a local folder.
Save the original file without changing it. Make a working copy for transcription and keep the original as a reference. A clear filename helps later: 2026-08-14-project-review-original.mp4 is easier to audit than meeting-final-final2.mp4.
The local transcription workflow
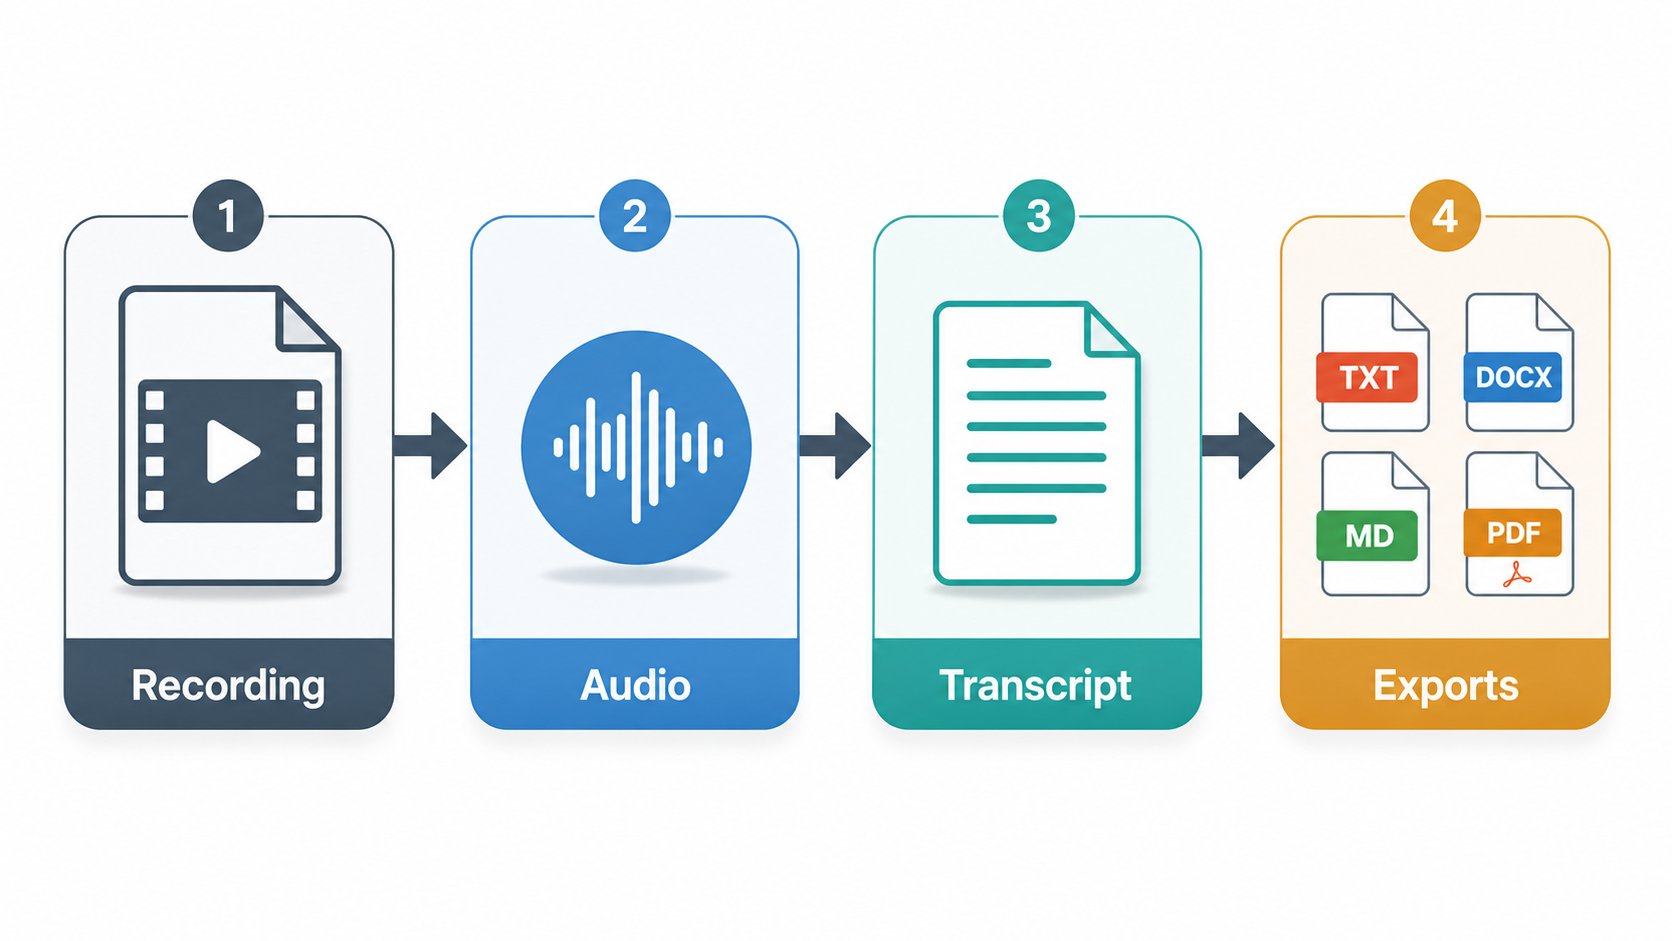
The process has four stages: recording, audio, transcript, and exports. Keeping those stages separate makes errors easier to find. If the transcript has missing words, you can check whether the problem came from the source audio, the language setting, or the export step.
1. Check the recording before you transcribe
Play the first and last few minutes of the file. Check that voices are present, the audio is not muted, and the file is not just a screen recording with no usable microphone track. If the meeting has long pauses or a noisy room, note that before judging the transcription quality.
Also check the language. A transcription model set to English may produce convincing-looking but incorrect text when the meeting switches languages or uses many names and technical terms. If the recording contains more than one language, decide whether to process it in sections or choose a multilingual model.
2. Extract or select the audio input
Most local transcription tools can accept the video directly. If yours cannot, extract the audio to a common format such as WAV or M4A. Keep the source sample rate and channels intact when possible; aggressive conversion rarely fixes a poor microphone and can create another variable.
For a normal meeting, mono speech audio is often enough. If two people speak over each other, do not expect an export setting to separate every word. Overlap is a recording problem as much as a transcription problem, so mark uncertain sections for manual review.
3. Choose language and speaker settings
Start with the language used most often in the recording. If the tool offers an automatic language mode, compare a short sample with a fixed-language run; automatic detection can be helpful for mixed content but can also switch unexpectedly when someone says a name or phrase from another language.
Speaker labels are useful for interviews and meetings, but they are not the same as knowing a person’s identity. A diarization result might say Speaker 1 and Speaker 2. Rename those labels only after checking a few turns against the recording. If you know the expected number of speakers, supply it when the tool supports that option, then review the sections where people interrupt each other.
4. Run a short test first
Before processing a two-hour meeting, cut a short synthetic or non-sensitive sample and test the settings. Include one clear speaker turn, one technical term, and a short overlap if possible. Compare the transcript against the audio rather than judging it from spelling alone.
Use the test to answer practical questions:
- Are names and product terms being recognised consistently?
- Are timestamps close enough for review and subtitles?
- Do speaker changes happen at sensible points?
- Does the output preserve paragraphs or turn everything into one block?
Once the short test is acceptable, run the full recording with the same settings. Keep the model, language, and export choices in a small note beside the output so another person can reproduce the result.
5. Review the transcript instead of trusting it blindly
Local transcription protects the file’s processing location, but it does not make the text automatically correct. Review names, numbers, dates, acronyms, and sentences near interruptions first. These details carry more risk than a missed filler word.
Use the recording as the source of truth. When a phrase is unclear, add an uncertainty marker or timestamp rather than inventing a clean sentence. For a customer or compliance workflow, keep the original transcript and a reviewed copy so edits remain visible.
Which export should you use?
| Need | Useful export | Why |
|---|---|---|
| Edit meeting notes | DOCX or Markdown | Easy to correct, reorganise, and share with a small team. |
| Archive a fixed review copy | Preserves a stable layout after the transcript is checked. | |
| Search or automate | TXT or JSON | Simple to index and pass into another local workflow. |
| Create captions | SRT or VTT | Retains timestamps for a video player or editor. |
Do not create every format by default. Export the one needed for the next step, and keep the reviewed source transcript beside it. If you need both notes and captions, generate both from the same reviewed text where the tool allows it.
Common problems and practical fixes
- Missing words: listen for low volume, room noise, or overlapping speech before changing the model.
- Wrong names: add a glossary or correct repeated terms after the first pass.
- Bad timestamps: check whether the source has variable frame rate or whether the audio was re-encoded.
- Speaker labels drift: reduce the expected speaker count and manually review interruptions.
- Huge output files: export only the formats needed and keep the original recording separate.
Keep the meeting private after transcription
Local processing is only one part of privacy. Store the recording and transcript in a folder with the right permissions, avoid putting sensitive text in filenames, and delete working copies according to your retention policy. If you need a guided local workflow, a video-to-text transcriber can take the recording through transcription and export without requiring another upload.
The reliable pattern is simple: confirm permission, preserve the original, test on a short sample, transcribe locally, review risky passages, and export only what the next person needs. That gives you a useful Teams transcript without treating an unverified first pass as the final record.

Writes guides and product notes for Bytesweavers.