How to Upscale Pixel Art Without Blurring the Edges
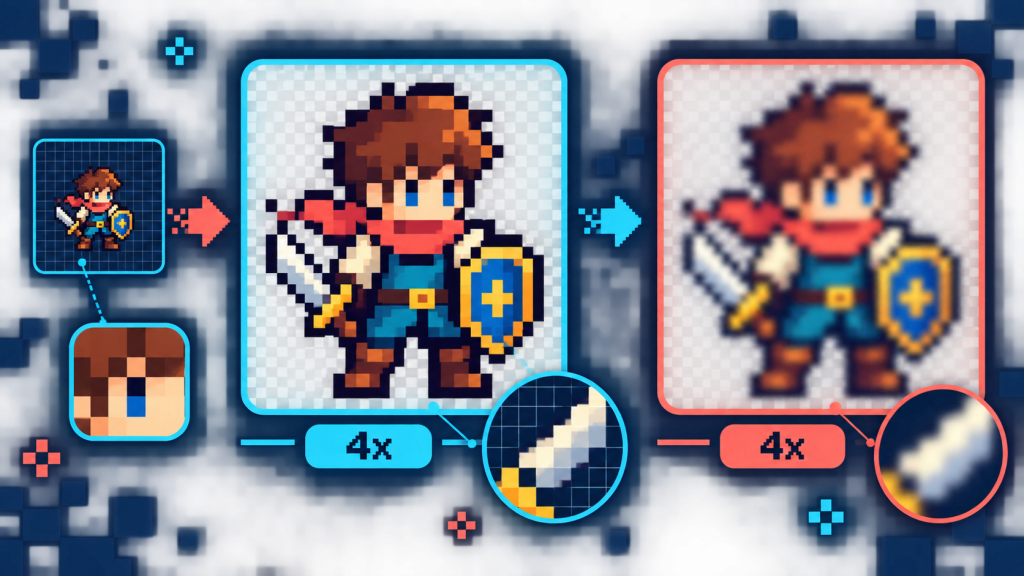
Short answer: to upscale pixel art without blur, enlarge it by a whole-number scale such as 2×, 3×, or 4× and use nearest-neighbor interpolation. This copies each source pixel into an equal block of output pixels instead of blending nearby colors. Use AI enhancement only when you intentionally want a smoother or more detailed reinterpretation, because it can change the original pixel shapes.
Pixel art is built from deliberate squares, stair-step curves, limited palettes, and carefully placed clusters. A normal photo-resize setting tries to hide those steps by blending neighboring pixels. That may help a photograph, but it makes a sprite or icon look soft. The workflow below keeps the original geometry, transparency, and palette as predictable as possible.
Why normal resizing blurs pixel art
Most image editors offer several interpolation methods. Bilinear and bicubic resizing calculate new colors from nearby source pixels. Those added in-between colors soften hard boundaries. For a photograph, that smoothing can look natural. For pixel art, it creates fuzzy edges and colors that were never in the source.
Nearest-neighbor resizing behaves differently. Pillow’s official filter documentation describes Resampling.NEAREST as choosing one nearest input pixel and ignoring the others. GIMP calls its equivalent interpolation setting “None” and explains that it copies the closest neighboring pixel. That is the behavior you normally want for crisp enlargement.
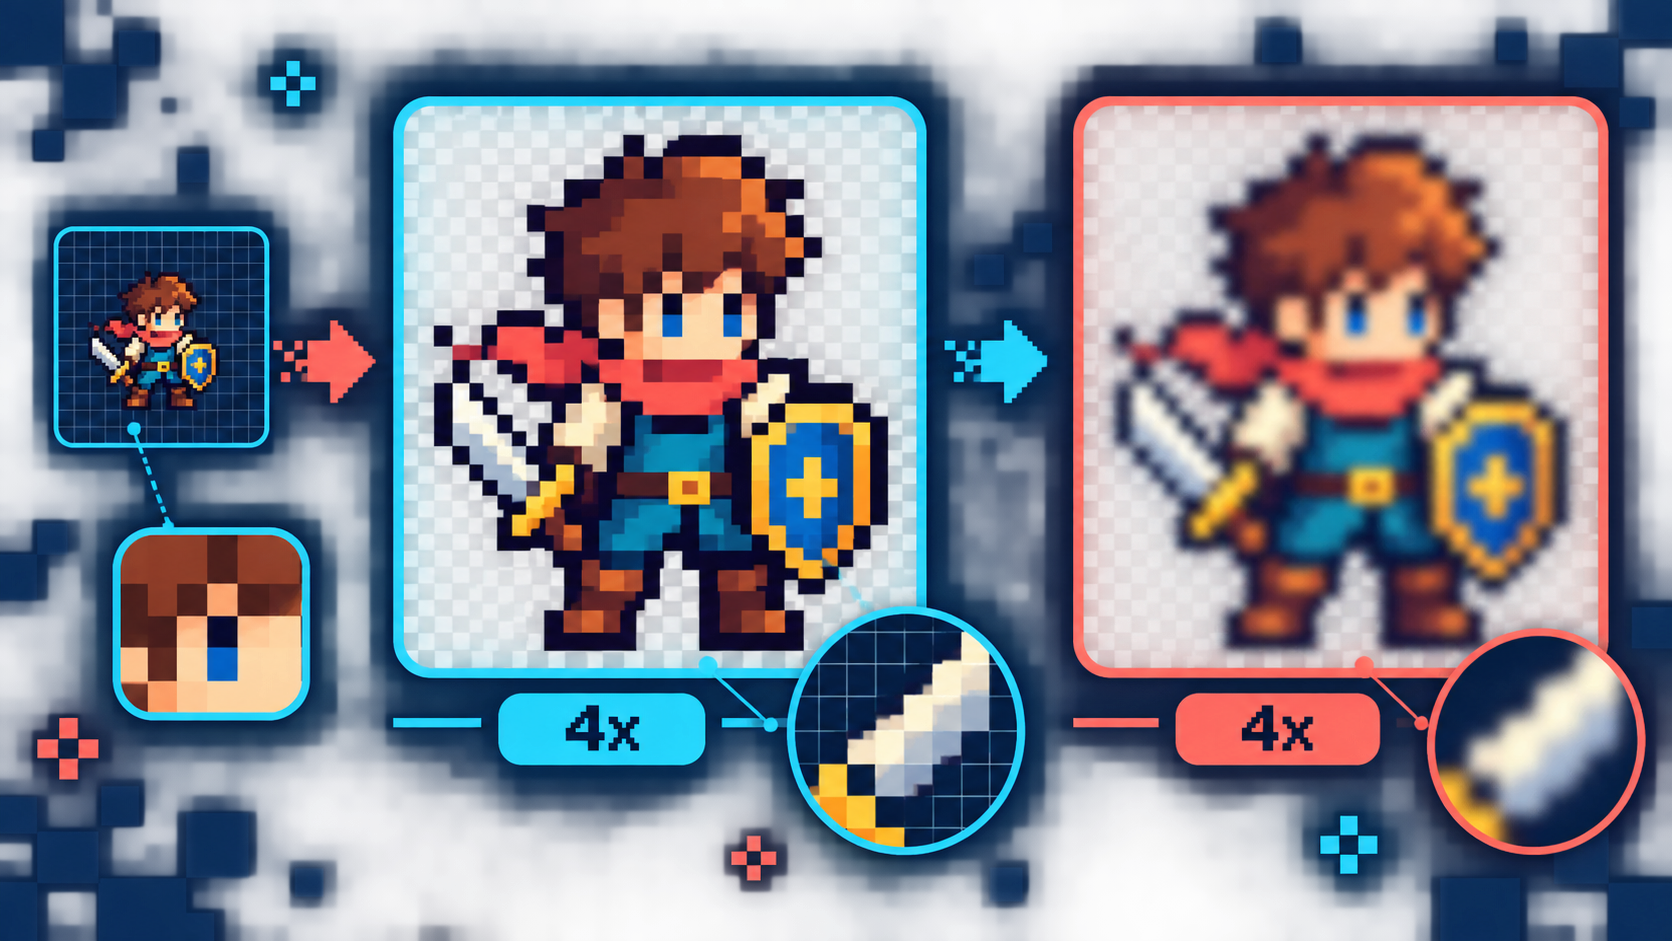
Nearest-neighbor versus AI upscaling
| Method | What it does | Best use | Main risk |
|---|---|---|---|
| Nearest neighbor | Replicates source pixels without blending | Sprites, tiles, icons, UI art, exact preservation | Looks intentionally blocky at large sizes |
| Bilinear or bicubic | Blends nearby pixels | Photos and smooth illustrations | Soft edges and new intermediate colors |
| AI enhancement | Generates a detailed interpretation | Concept previews or a deliberate remaster | Changed shapes, palette, outlines, or expression |
Nearest neighbor preserves the source most faithfully, but it does not invent detail. If the original is 16×16 pixels, a 4× enlargement is still the same 16×16 design displayed as 64×64. That is usually correct for game assets and archival exports.
AI upscaling has a different goal. It may round corners, redraw eyes, add texture, or turn a one-pixel highlight into a smooth reflection. The result can be attractive, but it is a new interpretation. Keep it separate from the exact nearest-neighbor master.
How to upscale pixel art without blur
The safest way to upscale pixel art is to keep the process simple: use a lossless source, multiply both dimensions by the same integer, select nearest neighbor, and inspect the exported blocks at 100% zoom.
1. Keep an untouched source
Work from the original PNG, GIF, or lossless project file. Do not begin with a screenshot that has already been enlarged by a browser or compressed as JPEG. A screenshot may contain uneven pixel sizes, color changes, or soft edges before you start.
2. Check the real pixel dimensions
Confirm the source width and height at 100% zoom. A sprite that looks like 128×128 on screen may actually be a 32×32 asset displayed at 4×. Use the true file dimensions for the calculation.
3. Choose an integer scale factor
Multiply both dimensions by the same whole number. A 16×16 icon becomes 32×32 at 2×, 48×48 at 3×, and 64×64 at 4×. A 64×64 sprite becomes 128×128, 192×192, or 256×256. Whole-number scaling gives every source pixel the same output footprint.
A non-integer enlargement such as 150% cannot divide every source pixel into equal blocks. Some rows or columns must become wider than others, which can create uneven line thickness. If a layout requires a non-integer final size, consider enlarging to the next integer scale and displaying it inside a fixed canvas without resampling the art.
4. Select nearest-neighbor interpolation
Image editors use different labels for the same basic choice: Nearest Neighbor, None, Point, or Preserve Hard Edges. Verify the preview at 100% zoom. If the edge contains semi-transparent or blended pixels that were not in the source, the wrong interpolation method is active.
5. Preserve transparency
Use a format with alpha transparency, normally PNG. Inspect the enlarged sprite on both a light and dark checkerboard or background. This reveals accidental white, black, or gray halos around the silhouette. Keep the color mode and alpha channel unchanged unless the destination has a specific palette requirement.
6. Export once and compare
Save the enlarged file under a new name such as hero-idle-4x.png. Compare it with the source at matched zoom. Look at one-pixel outlines, diagonal steps, facial features, corners, and gaps between limbs or objects. Each source pixel should become a clean square block of identical color.
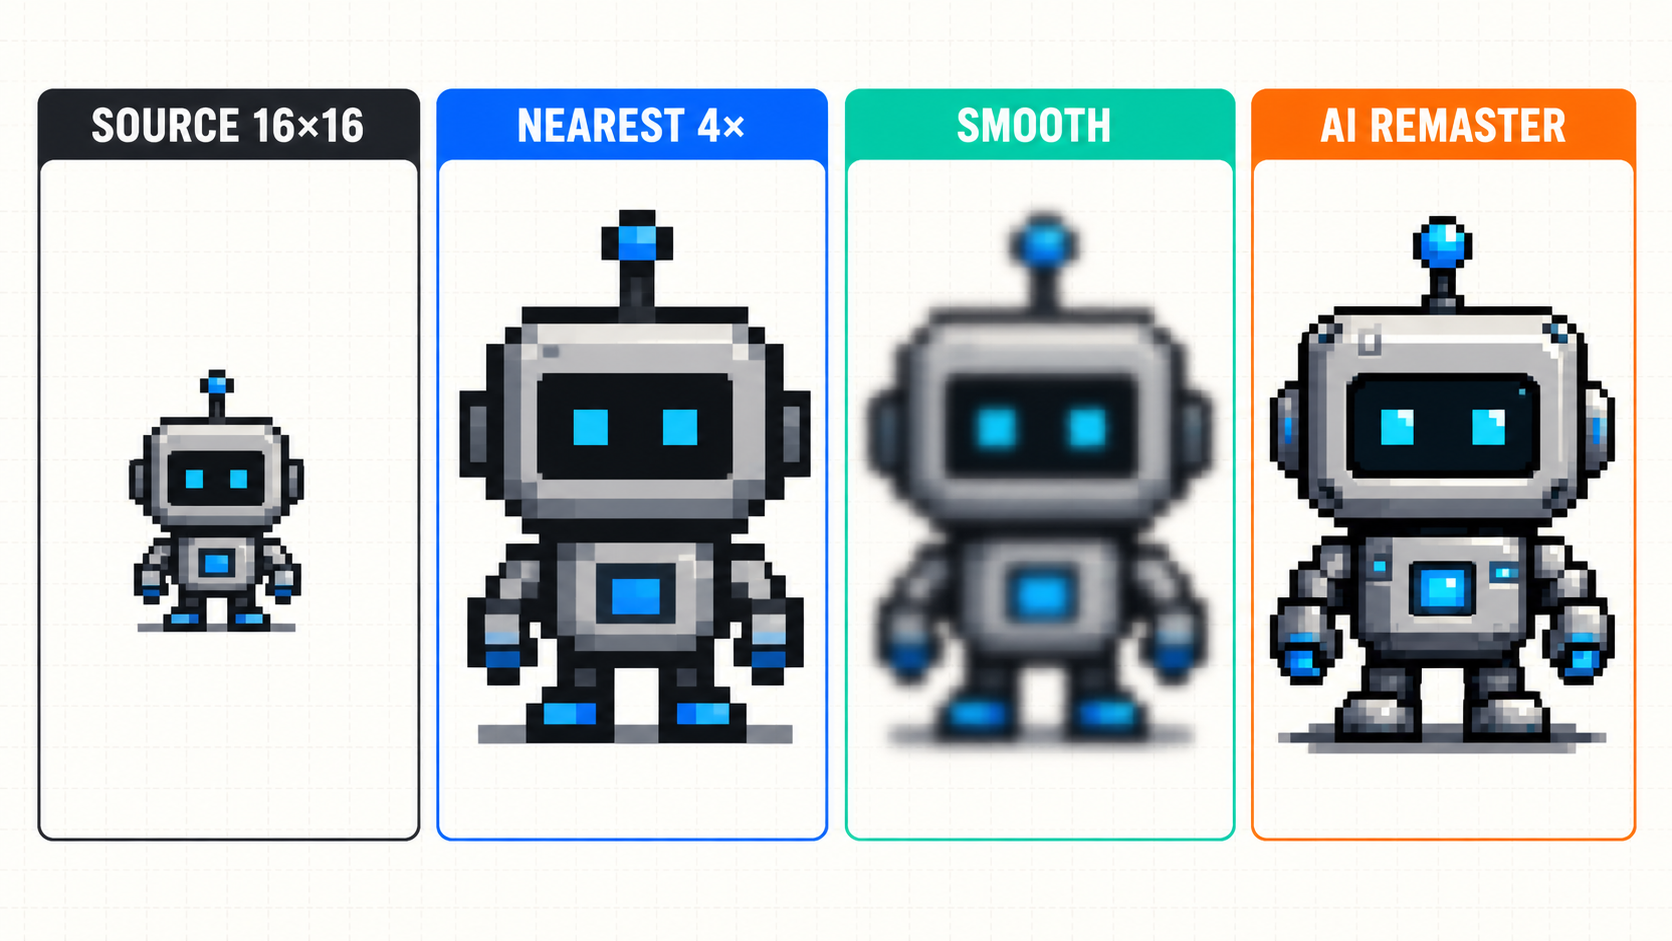
Three offline ways to upscale pixel art
GIMP
- Open the original image and choose Image → Scale Image.
- Keep the width and height linked.
- Enter a whole-number target size.
- Set interpolation to None.
- Export as PNG and keep the alpha channel.
GIMP’s official transform documentation describes “None” as copying the closest neighboring pixel, which is also known as nearest neighbor.
ImageMagick
ImageMagick’s filter documentation explains that point sampling selects the closest source pixel without merging colors. For a 4× PNG enlargement:
magick sprite.png -filter point -resize 400% sprite-4x.pngThe -sample operator is also designed for row-and-column replication:
magick sprite.png -sample 400% sprite-4x.pngTest the output rather than assuming every command-line preset is identical across unusual formats or color modes.
Python with Pillow
Pillow exposes nearest-neighbor resizing directly:
from PIL import Image

source = Image.open("sprite.png")
scale = 4
output_size = (source.width * scale, source.height * scale)
result = source.resize(output_size, Image.Resampling.NEAREST)
result.save("sprite-4x.png")
This is useful for repeatable batch processing. Keep the originals in one folder and write results to a separate output folder.
What to check before you upscale pixel art in a batch
- Mixed source sizes: calculate each file’s target from its own dimensions.
- Sprite sheets: scale the entire sheet by one integer factor so cell boundaries remain aligned.
- Indexed palettes: confirm that export did not convert transparent entries or reorder colors unexpectedly.
- Animation frames: keep every frame on the same canvas and use the same scale factor.
- Texture filtering in the game engine: disable smoothing there too, or a crisp PNG may still look blurred during play.
- UI placement: align enlarged art to whole screen pixels to avoid subpixel rendering.
When AI upscaling can help
AI enhancement can be useful when the goal is a remastered illustration rather than exact preservation. For example, you may want a large concept image based on a tiny character portrait, a smoother promotional render, or a background that needs more texture. In those cases, create an AI version from a copy and compare it with the nearest-neighbor master.
Check the silhouette first. Then inspect eyes, hands, weapons, symbols, and repeating patterns. Small pixel-art details are ambiguous, so a model may confidently redraw them in a different way. If the change affects character identity or gameplay readability, keep the original design.
Common mistakes
- Using JPEG: compression adds ringing and blocks around hard color boundaries.
- Scaling to 150%: non-integer output can make pixel blocks uneven.
- Sharpening a blurred resize: sharpening cannot restore the exact source geometry after colors have been blended.
- Forgetting engine filtering: the exported file can be correct while the game preview remains smooth.
- Replacing the master with an AI result: keep preservation and reinterpretation files separate.
- Flattening transparency: export PNG and inspect the alpha edge on two backgrounds.
Upscale pixel art: final checklist
- Start from the original lossless asset.
- Confirm the real source dimensions at 100% zoom.
- Use a 2×, 3×, or 4× integer scale.
- Select nearest neighbor, None, Point, or the equivalent no-blend option.
- Preserve PNG transparency and palette behavior.
- Check outlines, diagonals, gaps, and small facial details.
- Disable texture smoothing in the destination app or engine.
- Keep AI-enhanced versions separate from the exact master.
Frequently asked questions
What is the best scale for pixel art?
Use the smallest whole-number scale that reaches the required display size. A 2× or 4× export is common, but the correct choice depends on the source and destination.
Can I make pixel art larger without adding new detail?
Yes. Nearest-neighbor scaling replicates the existing pixels. It makes the file larger without inventing texture or changing the design.
Why is my pixel art still blurry after nearest-neighbor export?
The viewer, browser, game engine, or layout may be smoothing the image again. Check its texture-filtering or image-rendering settings and align the asset to whole pixels.
Should I use an AI upscaler for sprites?
Use AI only if you want a creative reinterpretation. For production sprites, tiles, and icons that must preserve exact geometry, nearest neighbor is the safer starting point.
For a separate AI-enhanced version, see AI Image Upscaler. Keep the nearest-neighbor PNG as the reference so you can judge whether any generated detail improves or changes the original style.

Writes guides and product notes for Bytesweavers.